Recovering Lost Wireguard Config on Mac OS
I was recently confronted with a catastrophic failure of Wireguard that resulted in a tunnel hanging on initialization, a situation that required a full restart to recover from. Upon restarting, my list of tunnels in the tunnel manager had all disappeared.
I spent quite a long time digging through docs and Googling trying to find a way to recover only my tunnel config from a Time Machine backup, so now you don’t have to. The guide below will help you recover your Wireguard configurations should you be facing the same kind of issue.
The proposed solution to this whole ordeal of course assumes that you have a backup. Since we are talking about Mac OS here, likely a Time Machine backup, but any backup solution that takes a full backup of your home folder and all subfolders will do.
The TL;DR is that if you have installed Wireguard through the App Store, you’ve probably been frantically looking through your backups for a config folder that does not exist.
Contrary to the usual configuration in Linux where config can be found at /etc/wireguard, the Mac OS client stores configuration in the user’s login keychain. There are no keys to speak of, since the private key is contained within this config, and the public key is seemingly derive by the tunnel manager front-end as required.
Users who have used Brew to install apparently have their config either at /usr/local/etc/wireguard or /opt/homebrew/etc/wireguard according to this blog, but chances are that you will find these folders empty.
Hence to recover your tunnel config, you’re looking for your for your keychain files, not anything Wireguard specific. Unless you have an exotic setup, your default keychain should be available at ~/Library/Keychains. Inside this folder, you will have:
login.keychain-dbmetadata.keychain-db- A folder with a long hex UUID for name
Go head and copy that entire Keychains folder to a temporary location, and double-click the login.keychain-db within it to open the keychain in Keychain Access. It will appear in a new section called ‘Custom Keychains’.
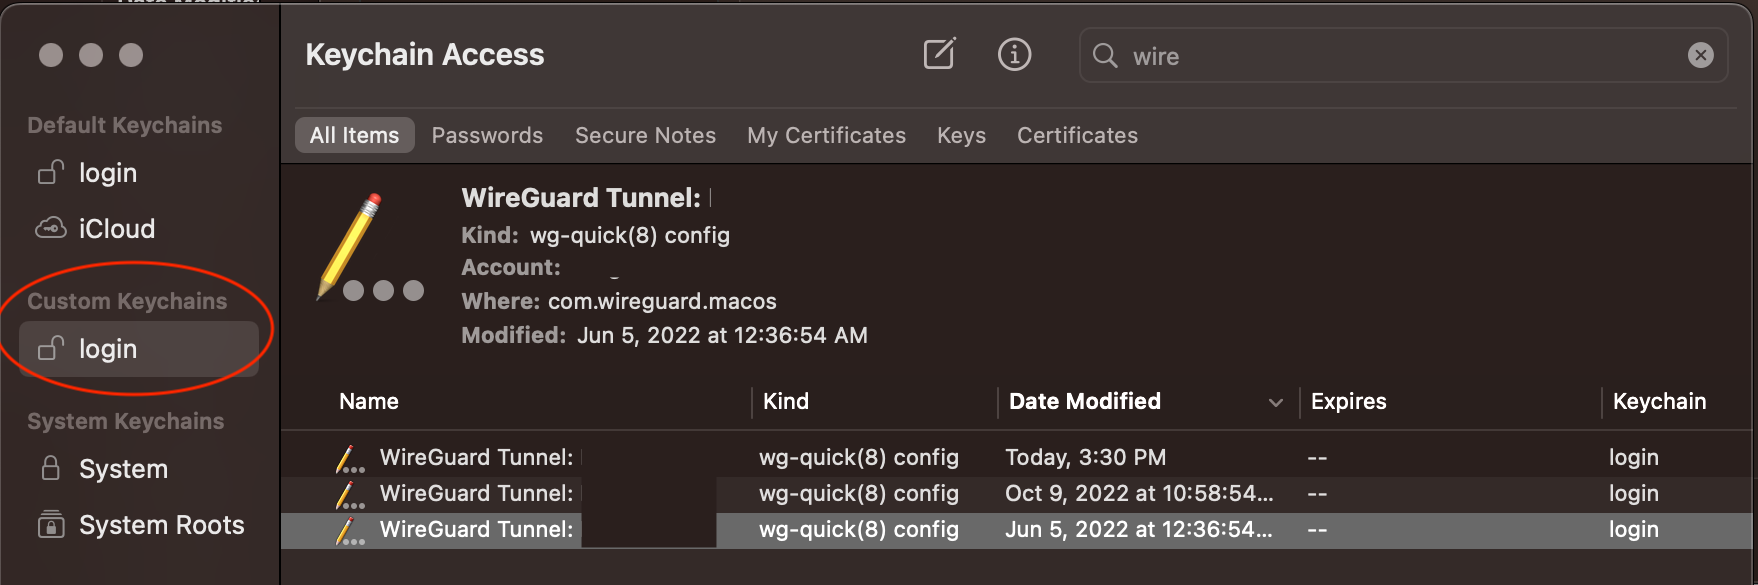
From here, you can find your config easily, since the entire Keychain Access app is searchable, and your tunnel configs will be in entries titled WireGuard Tunnel: *Name of Tunnel*. The entire multi-line config entry will be in the password field of the corresponding entires. After you take care of the password prompt to unlock your backup copy of the keychain, you can copy and paste the configs back into Wireguard.
No reload the far-side service, no changing keys, you’re back on track! Hope it helped.